Common name vs in-game name
Most players search for The Mimic, while some Bite By Night material uses The Project. It is the same killer, so this guide uses both names where it helps.
Quick take
Why players search both The Project and The Mimic
The naming split is one of the biggest search mismatches in Bite By Night right now. Local material refers to this killer as The Project, while many players still search the better-known franchise name The Mimic.
For strategy purposes, treat them as the same killer.
Fast buy verdict
If your question is should The Project be my first paid killer?, the answer for most players is still probably not.
The Project can be excellent, but local creator material keeps describing the killer as one of the most skill-dependent purchases in the launch pool.
That means this is usually a better buy for players who already know they enjoy:
- sequencing decisions
- mode management
- route planning before contact
- high ceiling kits that punish bad execution
If you still want a paid killer but do not want full stance complexity yet, local creator material often points players toward Doppelganger / Ennard first.
The core challenge
The Project gives you multiple answers, but only one of them is right for the next five seconds. That makes planning more important than reaction time.
Mode summary
- Speed Mode — best for gap-closing and map movement, worst for direct damage
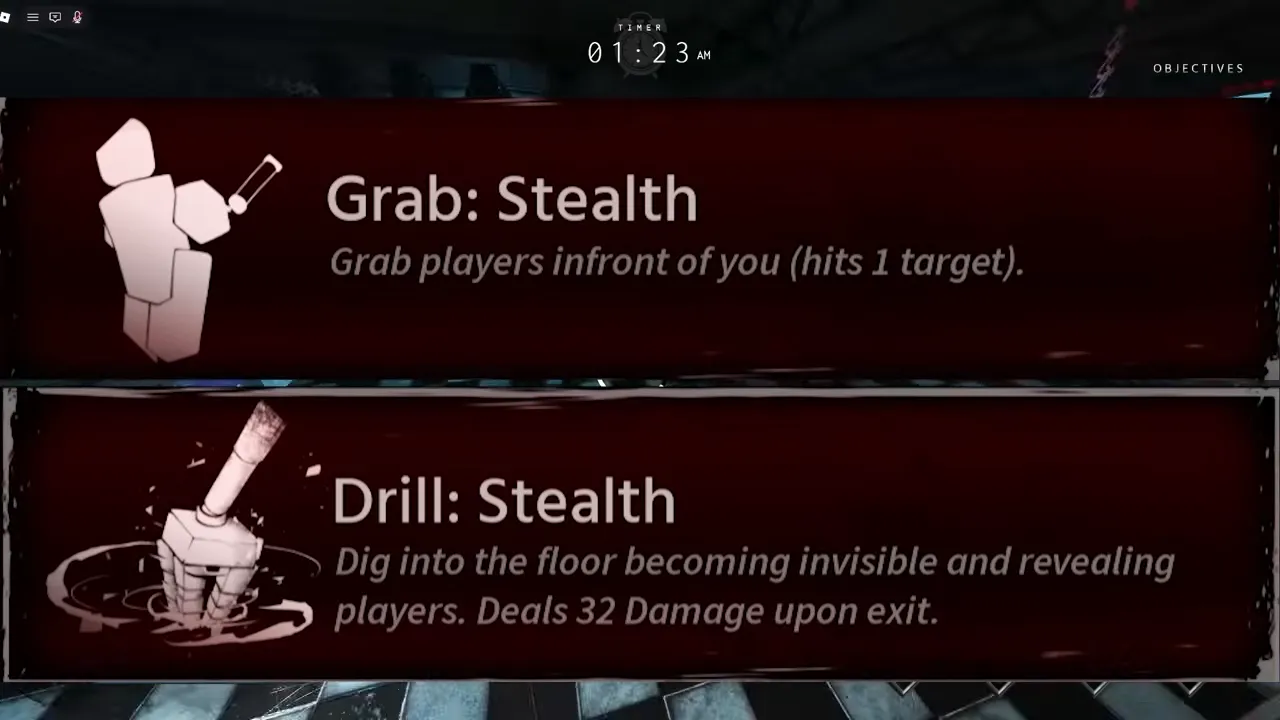
- Stealth Mode — best for ambush and drill pressure
- Strength Mode — best for clean finishing damage once survivors are cornered
What status-style advantages this kit gets
The Mimic is less about classic debuffs like Bleed or Blindness and more about temporary state control.
The clearest local status-effect support is:
- Speed while using Drill
- Invisibility while using Drill
- Undetectable while in Stealth Mode
That is why this killer feels unfair when you read him late. A lot of the pressure is front-loaded into positioning and surprise rather than a visible damage-over-time effect.
Use the Status Effects Guide if you want the broader system page instead of only The Mimic’s state advantages.
Why this killer is harder than it looks
The Project does not just ask whether you know what each mode does. It asks whether you picked the right mode before the next interaction started.
That is what makes the killer hard for newer buyers:
- Speed feels safe but overcommitting to it kills damage
- Strength feels strong but bad timing leaves you too slow
- Stealth creates openings, but only if your route read was right
Most new Project players do not lose because the killer is weak. They lose because they switch one decision too late.
Read the eye color first
The clearest quick-read in the local material is the eye color:
- Blue means Speed Mode
- Dark / unlit means Stealth Mode
- Orange means Strength Mode
Both sides need this read. Killers need it for cleaner sequencing, and survivors need it to know whether to spread, loop, or disengage.
Best habits
- Use Speed Mode to secure position, then swap before real contact.
- Force survivors to split before you commit a Stealth resurface.
- Track your switch cooldown like a resource, not a background timer.
- Enter fights with the next stance already planned instead of improvising under pressure.
The safest winning sequence
The local research set points to a simple rule: Speed gets you there, Stealth opens the fight, Strength ends it.
That does not mean every chase follows that exact order, but it does explain why The Project feels weak when players overstay Speed Mode or panic-switch after the mistake already happened.
Common beginner mistakes
- staying in Speed Mode too long once contact is already secured
- switching after the survivor escaped instead of before the cut-off
- forcing Strength in open space where the survivor can just leave
- treating every chase as a freestyle kit instead of a planned sequence
The killer gets much easier once you stop asking “what can I do now?” and start asking “what stance should the next five seconds require?”
Why this killer spikes in search
The Mimic keeps appearing in trend data because it solves multiple user intents at once:
- players want the correct name
- players want the eye-color explanation
- players want to know the best mode order
- players want to understand why LMS and chase music feel so distinct on this killer
The current local LMS material lists Dead Angle as the killer’s Last Man Standing theme, which is another reason the search demand keeps clustering around identity, not only mechanics.
Survivor counterplay
Read the eye color, punish Speed Mode loops, and push objectives in the five-second window after a mode change. Against less disciplined Mimic players, the best counterplay is often forcing the wrong stance before the real engagement begins.
Strengths
- Mode flexibility
- Fast map traversal
- High ambush threat
Counterplay
- Track the eye color
- Punish Speed Mode damage drop
- Exploit the 5-second switch cooldown